How to Configure Your Nessus Scanner to Perform RDS Scans
FedRAMP | Penetration Testing | Federal Assessments
Published: Jul 8, 2019
Last Updated: Jan 21, 2026
Though Amazon’s Relational Database Services (RDS) can make hosting a database much easier, using them can also present new challenges, including some that crop up when you’re trying to scan against security benchmarks or meet compliance initiatives.
For instance, to satisfy the scanning requirements for FedRAMP’s continuous monitoring period, many organizations opt to use Tenable’s Nessus scanner, but in our experience, we’ve seen many of our clients—who also use AWS RDS—run into issues when performing scans.
One of the most common things we hear as experienced penetration testers is:
“I can’t scan RDS—there’s no actual host there, just a database in the cloud.”
If this sounds familiar, we can tell you that’s indeed true—when you scan your AWS subnet that holds the RDS instance endpoints, you’ll return zero live hosts. However, you don’t have to leave it at that.
In this article, we’ll review how to configure a Nessus policy that will run successful scans using compliance benchmarks against an RDS database so that you can eliminate or avoid these common frustrations in meeting requirements.
Scanning AWS RDS with a Nessus Scanner – 5 Steps
1. Gather Credentials
You’ll need two pieces of information before you can get started with the configuration:
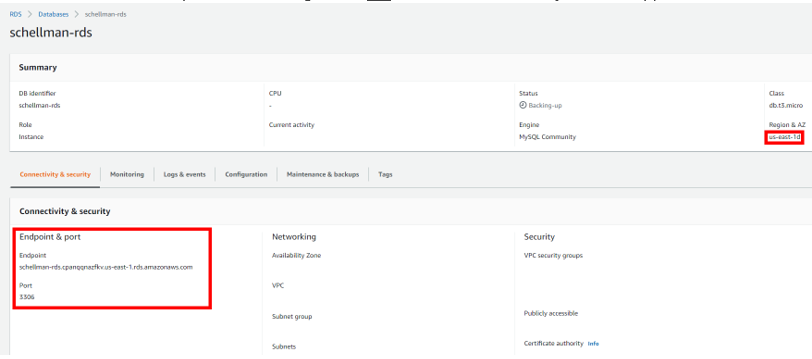
- The RDS endpoint URL or IP address
- Can be found in your AWS console under RDS -> Databases -> Database_name
- The master database username/password
- Can be found wherever you store your credential information (which hopefully is within a trusted password manager and not in an Excel sheet on your desktop)
- Can be found wherever you store your credential information (which hopefully is within a trusted password manager and not in an Excel sheet on your desktop)
2. Set Up “Advanced Scan”
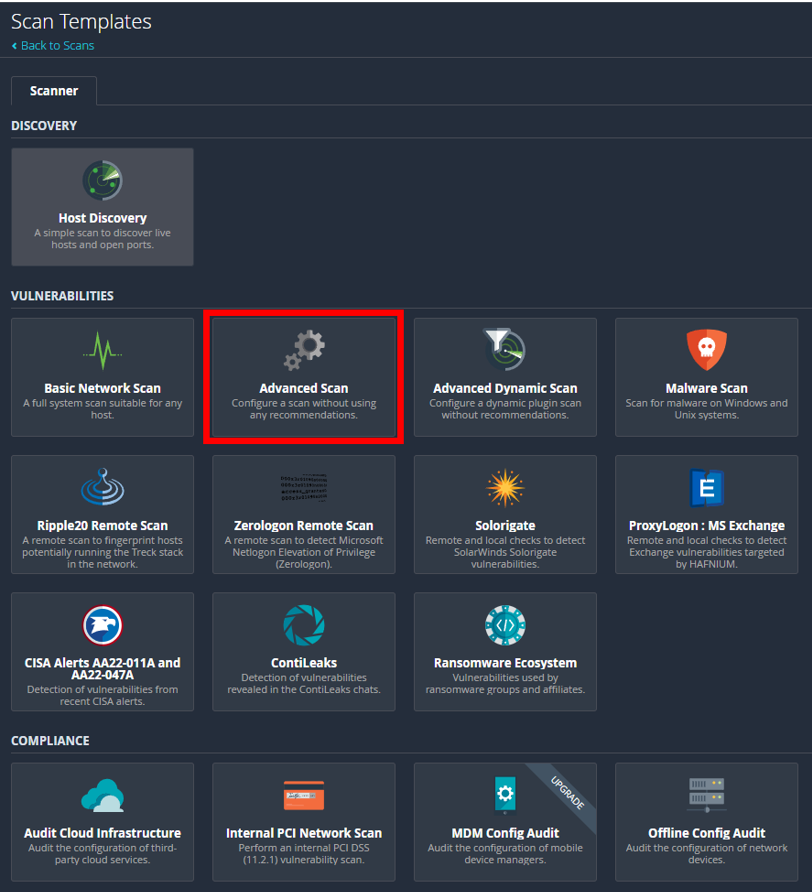
When you have this information in hand, you can navigate to your Nessus management page and begin configuring a new “Advanced Scan” policy.
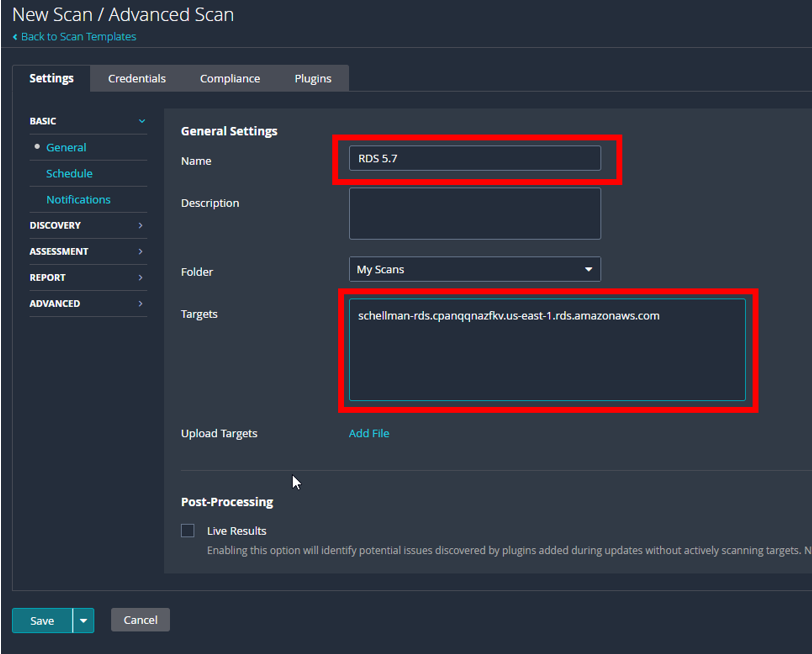
First, make sure to edit the “General Setting” section and enter the name of the scan and the target (endpoint) that you gathered from RDS in AWS.
Next, you can start stripping out the “vulnerability” scan part of the policy. We’re not setting up a discovery scan, so:
- Under settings, go to “Discovery” -> “Host Discovery.”
- DISABLE ping.
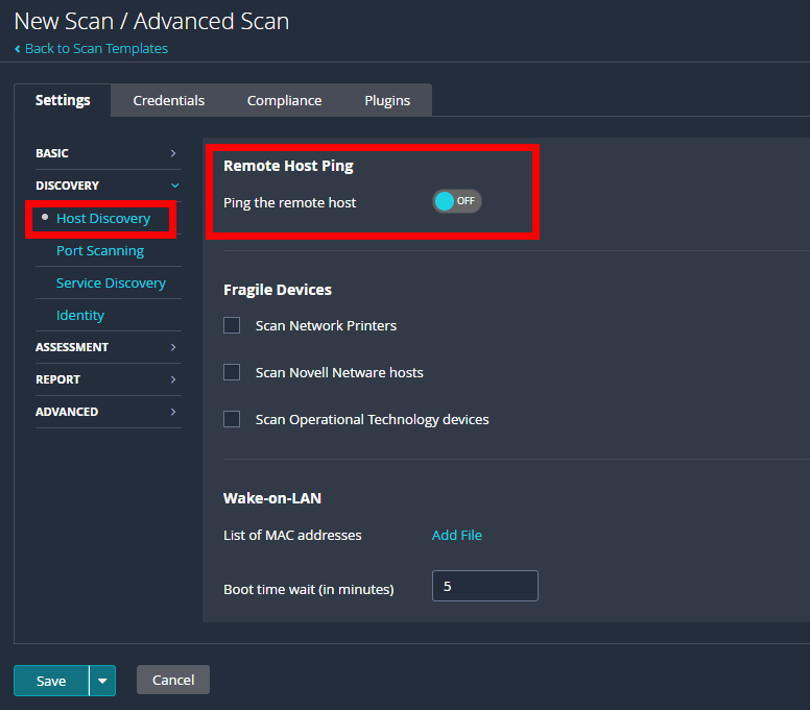
As penetration testers that work extensively on FedRAMP projects, we know this is a critical step—skipping this setting is the number one issue we see with cloud service providers (CSPs) and their scans. RDS instances won’t respond to an ICMP ping even if a security group that allows it has been attached to the instance. Because of this, Nessus will ping, then skip over the host by default when it doesn’t respond.
3. Modify Port Scan Range
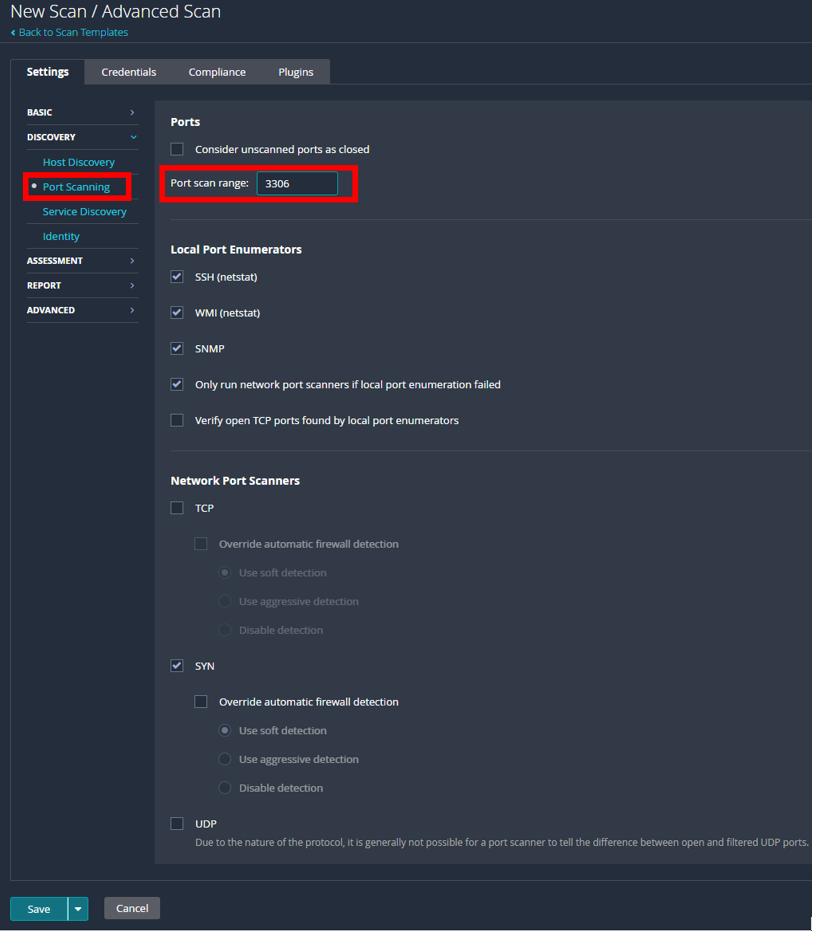
Next, navigate to the “Port Scanning” page right below “Host Discovery” and modify the port scan range.
Pull the default value of “default” and instead substitute whatever port your database is running on. Default values to change may include:
- 3306 for MySQL
- 1433 for MSSQL
- 5432 for Postgres
- 1521 for Oracle
Remember, this isn’t a vulnerability or discovery scan—it’s a targeted compliance scan, so there’s no need to force Nessus to check another several thousand ports that won’t be open.
4. Configure Scan Credentials and Benchmarks
After that:
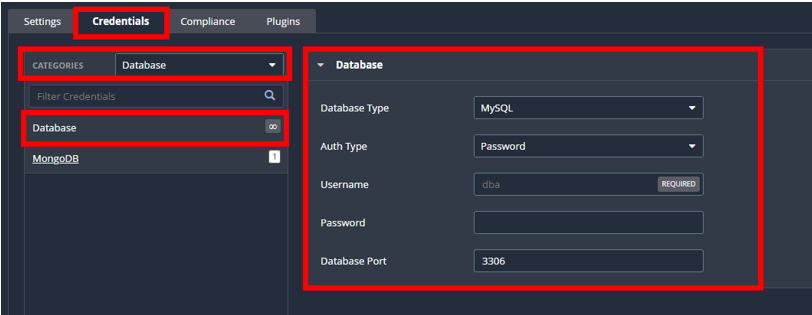
- Head to the “Credentials” tab.
- Select Categories and choose “Database” from the drop-down selection.
- Using the username and password you collected in Step 1, fill out all the current information of the database you will be scanning.
Then, under the “Compliance” tab, pick your benchmark. For the purposes of this example, we’ll be using the MySQL 5.7 L1, but any of the CIS or STIG benchmarks will run against RDS hosts.
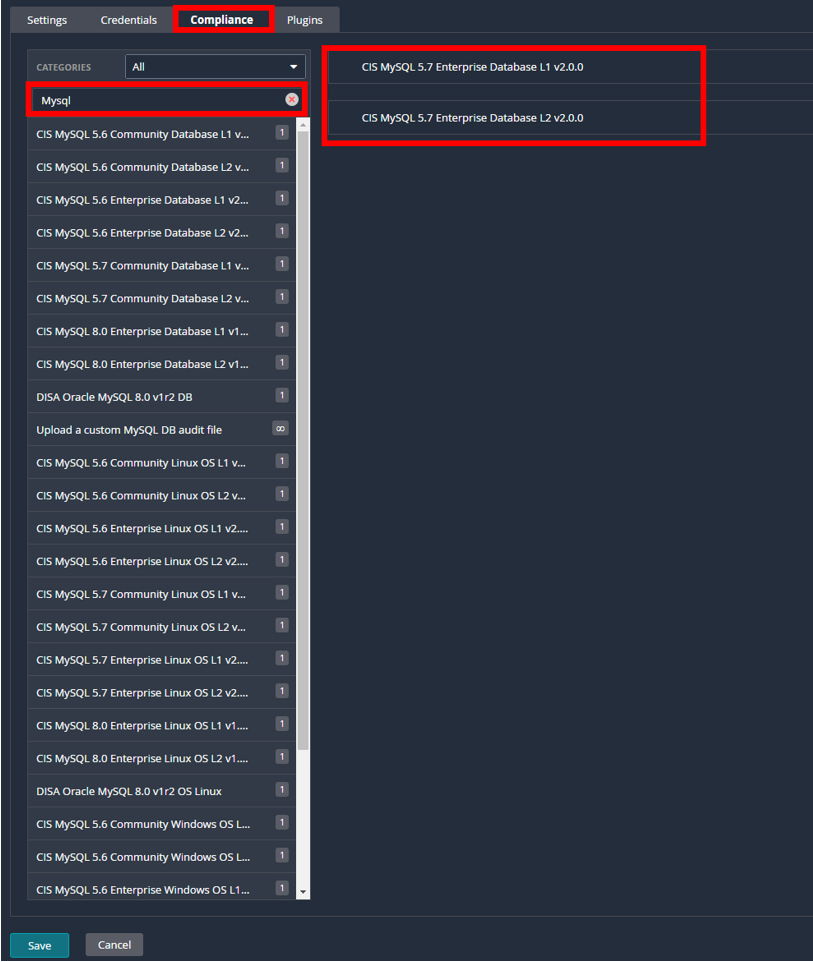
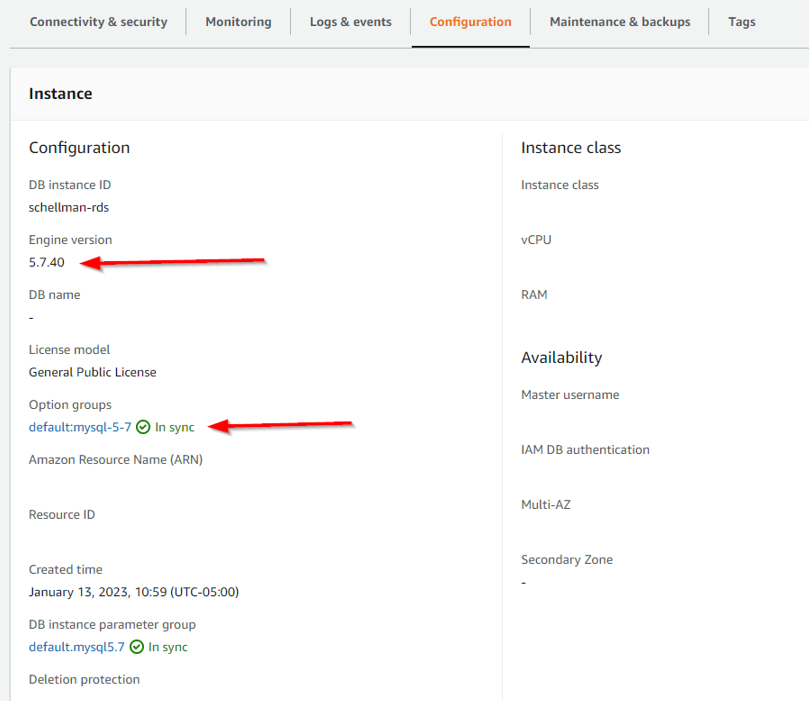
If you’re unsure what benchmark to use, go back to RDS in AWS and locate the version of your database you are using. Find this by navigating to RDS->Database->Datasebase_Name->Configuration Tab->Engine Version.
5. Save and Scan
Once that’s complete, you’re done! You can save the policy and head over to create a new scan, which is relatively simple—just pick your policy and add your endpoint addresses before you can begin scanning away!
Warning Designations
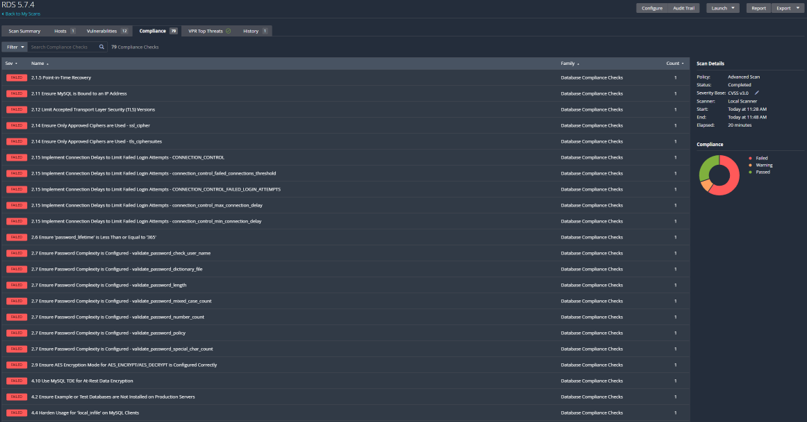
One last important note: If you see a warning in the compliance scan after it has been completed, click on the warning and read the description.
Should you see the below message, you’re more than likely using the wrong benchmark (i.e., using Community Edition instead of Enterprise or the opposite).

Next Steps for Your FedRAMP Scans
Commonly recognized as one of the most difficult compliance projects to get through, FedRAMP features plenty of complications that could present problems to any organization attempting to achieve success. Scanning represents a significant part of the program’s requirements, but now that you understand how to correctly set up your Nessus scanner to get you what you need from your RDS database, you’re in better shape to proceed without hang-up.
But scans are just one step—there are more details on how to avoid further issues with those in our article on common FedRAMP pitfalls. For even more complete guidance on FedRAMP’s penetration testing, you can also check out our breakdown here.
And, if you find you still have further questions regarding scans or other FedRAMP complexities, please feel free to contact us to be put in touch with one of our experts who would be happy to ease your concerns.
About Kent Blackwell
Kent Blackwell is a Director with Schellman. Kent has over 9 years of experience serving clients in a multitude of industries, including the Department of Defense and top cloud service providers. In this position, Kent leads test efforts against client's web applications, networks, and employees through social engineering campaigns. Additionally, Kent works with Schellman’s FedRAMP and PCI teams to ensure customer’s compliance needs are met in a secure and logical manner.


